Take a look at your insect and try to estimate the depth between the bottom of the thorax and the point at which the wings are attached.
Make sure that there is enough room for the full wingspan of the insect. Take your x-acto-style knife and gently carve away an area on the styrofoam
approximately that deep and wide enough for the widest part of the insect’s thorax. Then smooth out the depression with your finger. (If you don’t like
touching styrofoam or for very small insects, you can also use a cotton swab instead.) This usually results in sort of an oval shaped depression for me.
It doesn’t have to fit perfectly and a little too wide is better than a little too skinny. The vellum you place on top may curl when it touches the wet
paper towel/cloth, but it will uncurl shortly.
Try test placing your insect. If you feel you haven’t gone deep enough, carve out a little more and smooth it again. If you mess up or went too deep,
don’t worry. You can always just move to a different area of the styrofoam and you have plenty of time before your specimen will harden again.
while pressing down lightly with tweezers as if it's pinned.
(I personally like to keep these styrofoam boards when I’m done, even when they are full of depressions. I can usually find a depression that either
fits a new specimen or needs only slight enlarging to work. As an added bonus, it produces less waste, which is great since I don’t live in an area with
styrofoam recycling available.)
The video below shows what to look for when checking if the insect is relaxed enough. (You can move your mouse off the video to stop seeing the controls)
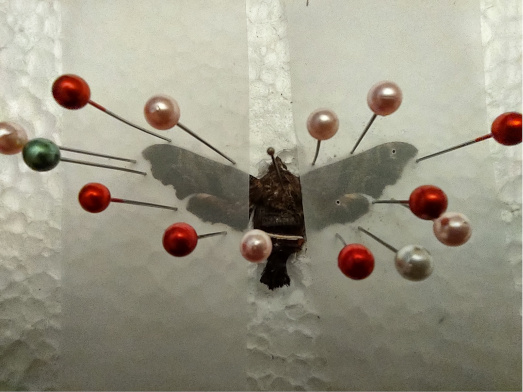
Cut two pieces that will be large enough to cover each set of wings, with room to spare for the straight pins that will hold it down. If you like, leave
a little extra space on one of them to write the date as you will need to make a note of that for the drying process.
Place the insect so that its thorax is in the depression on the styrofoam you made and pick an area in the center of the thorax. This will leave a tiny
hole that will be visible on some specimens if you choose to use a riker mount and you might leave the pin in if you use a shadow box, so choose carefully.
In my experience, other sites such as between the thorax and abdomen don’t hold it stable quite as well, and on very small insects can just break the waist
completely.
Try for as straight vertically as you can and insert the pin through the specimen and into the styrofoam. An angled body can make manipulating the wings
into position more difficult. Holes on the bottom of the insect won’t show, so if you pin and find that it’s too angled: pull the pin about halfway back out
of the thorax, adjust the angle with the tip of the pin inside the thorax, and re-pin.
A note on where to pull on wings:
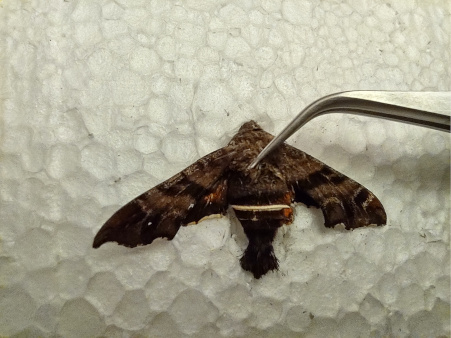
At the top edge of most insect wings is a larger and more sturdy vein. Gently grab this edge with your pointy tweezers, avoiding the very tips as they tend
to be more delicate. Hind wings are more difficult, particularly with butterflies and moths. Take a close look at the veination of the hind wing and try to find
one near the middle (if you want the forewing to slightly overlap the hind wing) that looks the thickest. You wont grab this one with the tweezers, but instead
try to catch the very edge of it with the point of the tweezers and gently nudge it upward.
Pull the forewing on whichever side you prefer to start with in an upward motion and as flat to the styrofoam as possible. When you get it where you want it,
hold it there with the tweezers with your dominant hand. With your other hand, place one of the pieces of vellum down over the wing from the bottom up and
gently press it down as you slide the tweezers off and out from beneath the vellum.
Hold that in place with your non-dominant hand, and then begin sticking the straight pins through the vellum very close to the wing.
If you are spreading a butterfly, dragonfly, or moth where you still need to position the hind wing, do not put pins under the forewing. Instead try to
place them just under the outer edge to prevent the wing from sliding down.If you are spreading one of the insects with a coupling mechanism, place pins all around the two wings.
If you are spreading something where you want to display the legs, such as the formidable forearms of a giant water bug, Lethocerus americanus there
is no need for vellum on top of such sturdy legs. Simply get them into place and put pins directly against them to hold them in position.
(You can also position insect antennae and just put a pin next to them to keep them from falling to the sides.)
For the hind wing, grab the bottom edge of the vellum with your non-dominant hand. Lift and hold it up while maintaining a small amount of pressure on the forewing.
This will give you room to adjust the hind wing. (You may need to pull a lower pin out if there is not enough room to lift it sufficiently.)
Carefully try to find a vein and nudge the lower wing upward as described above. It’s not super easy to snag the edge just right. If you accidentally poke a
tiny hole in it with your tweezers, in my experience you can still continue on and it won’t really show that much. I have in more than a few instances caused too
large a hole to continue on and have just had to pick another vein. You will need to decide for yourself if the damage caused is too much for your personal collection.
In many cases, the wing will flatten out once under the vellum and doesn’t really show a hole or small tear if mounted in a riker. (I will go over the pros and cons
of different mount types in the mounting section.)
I felt that the right hind wing in this specimen did not match the left side perfectly, so the video below shows how to hold the vellum while adjusting the hind wing.
Once you have the hind wing in place where you like it, lower the vellum back down and place more pins around the set of wings.
It can sometimes be difficult to get both sides perfectly even with each other and occasionally just laying down the vellum can move one out of position a bit.
The see-though nature of the vellum makes it easy to see if one side needs adjusting. Just remove pins where you need to, lift the vellum and reposition until you
are happy with it.